Partitioning
The use of partitioning is a brilliant solution to efficiently and purposely create separate volumes in your office space…


Greg contacted us to assist with partitioning and installation at OLG in Johannesburg as part of their project for OLG’s new training facility.
They already had a clear picture in mind of the partitioning layout required but also required carpet tiles installed, painting done, laminated floors installed as well as artificial grass in the chill lounges.
Some existing partitioning had to demolished and new ones build. We also had to install tops between the partition to create seating areas for student interviews ext.
After all was completed the electrical articulation was completed .
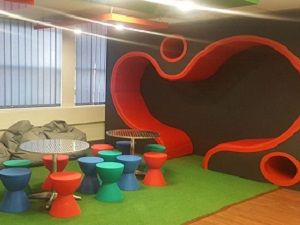
The partitioning was then painted with red, blue and green being used to create an environment conducive of training on specific feature walls.
As can be seen the final product was not only functional but also aesthetically pleasing and met the desired outcome of not only a unique training facility but also and exciting and conducive environment.
The structure was created from galvanized floor track which was fixed to the floor with nail in screws, aluminium natural anodized wall channel fitted to the ceilings and partitioning where required and galvanized studs as per supplier recommendation. Corner sections done with galvanized angle and all secured with drywall screws.
It needs to be noted that accuracy when constructing the partitioning is of utmost importance. If the structure is poorly constructed the end product will be of poor visual quality.After the drywalling structure was completed 12.5mm Gypsum board cladding was used.
Windows was fitted using natural anodized aluminium glazing sections, natural anodized beads, bubble gasket and 6.38mm safety glass.
Doors fitted to partitioning had natural anodized aluminium frames, natural anodized hinges, medium duty hollow core doors and standard lock sets.
Joint was then fiber taped and two coats Rhinoglide applied. Once dry, the joints was sanded to a smooth finish in preparation for painting.
Well done to the team!!!
Below a link with some more information: